Understanding Your Programme
Learn how your programmes work with AT ONE
Here at AT ONE, the majority of our programmes operate using the ‘R7 System’ for training and rehabilitation as the base. Each one is different as it completely depends on the individual we are working with. You may only see a handful of the sections or all of them. Now, as much as we would love to take credit for this, we have to say thanks to the incredible team at IFAST for introducing this to us.
In our experience, this model allows us to create a programme that really allows you to gain maximum benefit both within your sessions and out of them as you enter the period after your training known as recovery.
We have provided a brief breakdown of the R7 on this page but if you want to know more about the science behind this incredibly powerful training/rehab system, please just ask.
For now however, let’s get to grips with how your programme works for you.
The Principles of the R7
R1 – RELEASE
R2 – RESET
R3 – READINESS
R4 – REACTIVE
R5 – RESISTANCE
R6 – RESISILIENCY
R7 – RECOVERY
R1 - Release
The goal here is to use decrease stiffness and tone within your body. You can use many different types of tools such as cricket and tennis balls here but most commonly used is a foam roller. Foam rolling can help move water around your muscles which may help them feel “less tight”. It also sends a signal to your brain saying:
“Hey, this muscle here is a little toned up can you release me please?”
The most important thing to note here is if you think it is working, use it, if you don’t think it is just leave this section out. However, if you haven’t tried it give it go.
R2 - Reset
The reset, as the name suggests, resets your body. It places your body in more of an “optimal alignment”. This is a big deal because if your body is off alignment as you perform exercise, ultimately there is:
a) An increased risk of injury in training/re-injury for rehab clients
b) A very high chance you will not get full benefit from the exercises. If you are unable to move properly
due to poor alignment, your body will have to compensate which means you are now not able to train
the right muscles appropriately.
Just think of it as this, if you not in an “optimal” alignment it’s like starting 10metres behind the start line. Another geeky benefit from performing a reset is that it helps restore balance to your nervous system.
Without going too in depth here your body is always dealing with stress. Whether this stress is mental (job, relationship, financial etc.) or physical (poor nutrition, poor exercise, poor sleep), the point is it all has a profound effect on your body. This stress, if left unchecked, can have a profoundly negative effect on how your body moves.
This is where the power of “the reset” comes in. By performing “the reset” we optimize your position
(alignment) whilst at the same time “resetting” the levels of stress within your body. This helps restore your movement, mobility and strength so you can train/rehab far more effectively.
R3 - Readiness and Rehabilitation
For training clients this is essentially your warm up. For rehabilitation clients think of this as your rehab
section. We hope that you all realize the importance of this. Ultimately the exercises in the section will decrease risk of / address your injury and ensure that you are working to the best of your body’s ability when your start/return to jumping, lifting and running etc.
Another goal of this section is to optimize your new range of movement gained from performing your reset.
Resets are great but in order for them to truly stick you need to cement the new range of motion that you
have gained from them by taking the time to perform the exercises PROPERLY in this section.
This section contains dynamic mobility exercises. These exercises can be far better than old school static
stretching when performed properly as they help improve muscle position through stabilization and control.They also help fire up your nervous system to develop superior strength and control.
When performing these exercises really concentrate on performing theses exercises correctly, even doing
something properly like a simple straight leg raise will make you feel muscles that you never thought you had!
R4 - Reactivity
The goal of this section is to improve your power, explosiveness and general athleticism. As we age, we can lose twice as much power as we do strength. Therefore, if we intend to be able to continue to move fast, we must train for it! Put simply:
“If you don’t us it, you LOSE it!”
This component of the session ensure you are able to continue to play sports, play with your children or have an active job without issue. After all, being an athlete, having to react in time to jump out of the way or simply being a grandparent chasing after a grandchild, all require a degree of athleticism.
R5 - Resistance
This is the section where we get you stronger.
This area is absolutely crucial and is most definitely NOT just for individuals such as strongmen and body builders. You need to be strong to deal with gravity, with life and prevent/address injury.
Look at it this way, you are not just made up of muscles. Your bones, ligaments, tendons, nervous system, heart, brain and even the discs in your spine NEED to be strong. Best part is, they can be made stronger too and it is within this section that we intend to do just that!
This section is where we will give you targeted exercises using weights, bands, kettlebells or your own bodyweight. What we give you depends on your needs and goals but rest assured, you will definitely feel the benefit as you go through your programme!
R6 - Resiliency
This is the metabolic/energy system component of your training session. This is specific to the goal of the programme. Generally speaking, for rehab it start more gentle but for training clients this will be some form of interval-based training. The length of work and rest period will be dictated by the goal. If strength is the goal the interval will be short and recovery period long. However, if weight loss is the goal, the interval may well be longer and the rest period shorter.
This section is extremely important for you to do, as it helps build up your work capacity. The greater your work capacity the RESELIENT you are.
R7 - Recovery
Last but not least is the recovery section. Whilst you’ve been exercising you’ve essentially being switching your body “On” so the goal here is to shut things “Off”. This is a hugely important process as it will kick start the recovery process. Your breathing, particularly your exhale is your line of communication to your nervous system. This is will switch your body from the stress or ‘fight or flight ‘effect of your workout to recovery or ‘rest and digest’. It is only during the recovery period does your body get better from the hard work put in from your workout. If you don’t make it happen all you will do is beat your body up and not see any results. We can ensure you that if you do this at the end of each session, really will feel much better in body and mind!
SO PLEASE TAKE THE EXTRA COUPLE OF MINUTES AND GET IT DONE!
How to use and read your programme
So now you understand the principles of what you will be doing. All you need now is to understand how to go about performing each section.
Abbreviations
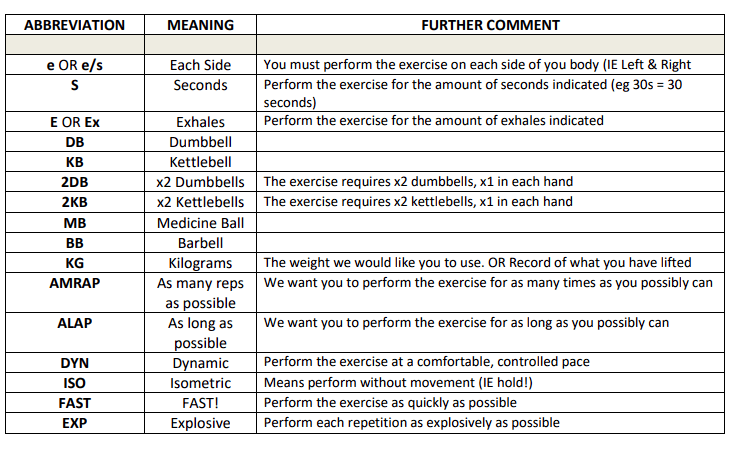
Before we start however, you will need to understand the abbreviations that we use when writing your programme.
Please make reference to the table below:
R3-5 - Exercises
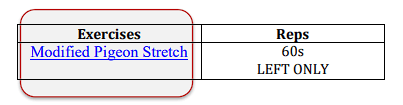
Hopefully this part is straightforward! This is simply the name of the exercise we want you to perform. They are all hyperlinked meaning you just simply tap or click on the name of the exercise to be taken to an instructional video by a member of the AT ONE Team.
Always perform the exercises in the order you are given. Do not skip an exercise unless you have a problem with it in terms of dizziness, chest pain, bodily pain, discomfort or you feel your safety is compromised etc. If this is the case let us know immediately!
Please also do not perform more than your allocated number of sets or reps. We have assigned them for good
reason so please stick to them.
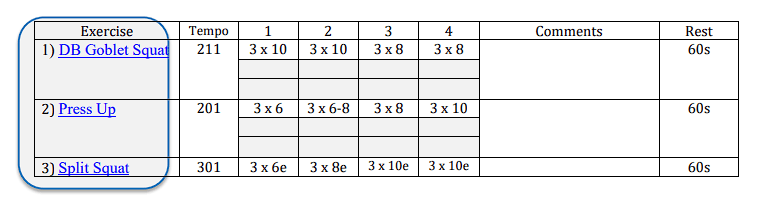
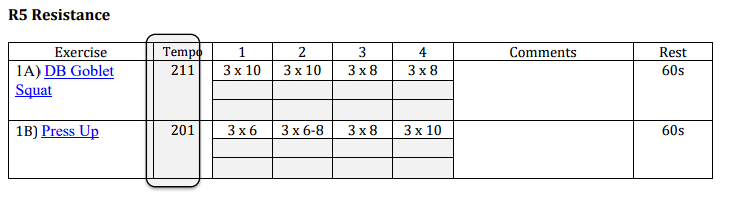
How we arrange your exercise sometimes differs. Sometimes we will ask you to perform and complete one exercise on its own before you move onto the next.
For example, if you look at the sample programme above, it reads in the order of 1, 2, 3. This means we want you to perform exercise number 1 (DB Goblet Squat) on it’s own and complete all 3 sets before you move onto exercise number 2 (Press Up).
However…
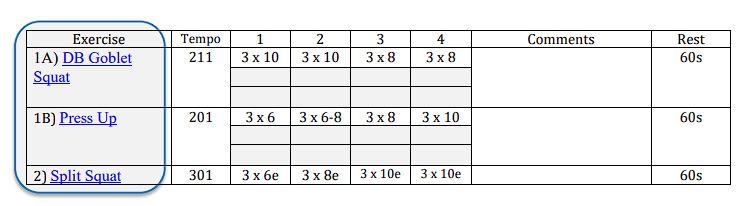
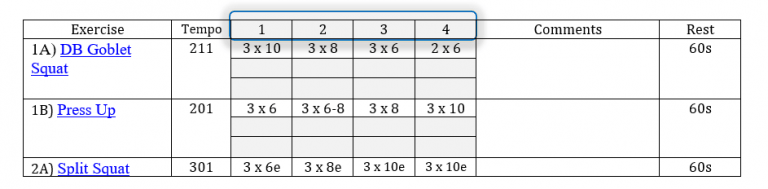
If you now look at the programme above, it is the essentially the same programme but the ORDER that we would like you to perform the exercises in has changed.
It now reads 1A) DB Goblet Squat, 1B) Press Up.
This means we have paired the 2 exercises together. This is known as a “superset”. If we look at week 1, all you have to do now is perform the squat first for 10 reps, then rest for 60s and then perform the push-ups for 6 reps. You would then rest for 60s, return back to the squats again and repeats both exercises in this fashion until you have completed 3 sets.
Tempo
This is the speed at which you’ll perform each repetition. The first number is the eccentric or lowering portion of the lift. The second number is the midpoint or pause during the lift. The third number is the concentric or lifting portion of the lift.
For a squat we may use a 211 tempo. In this case, it would look like this:
2 – 2 seconds to lower the weight
1 – 1-second pause/hold at the midpoint
1 – 1 second to lift the weight back to the top position.
However, on pulling exercises like rowing and chinning variations it is the reverse because you lift the weight first. If we use a dumbbell row using a 211 tempo for example it would go like this;
2 – 2 seconds to lower the weight
1 – 1 second hold the weight at the midpoint
1 – 1 second to “lift” the weight
You may also see the following abbreviations:
Dyn = Dynamic, or work at a comfortable, controlled pace
Exp = Explosive, or lift as quickly as possible
ISO = Isometric, or hold at the midpoint of the lift
Your Exercise Weeks
The numbers at the top of each column are the week that you are on i.e. weeks 1-4. Always ensure you complete your programme 1 week at a time. We will have structured your weeks in a deliberate fashion so that you may improve at a manageable pace and ensure you are always moving forwards towards your goals.
Sets and Reps
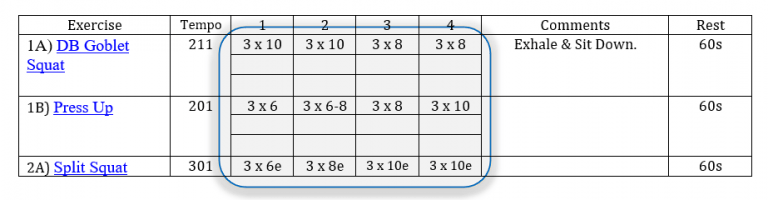
Below your exercise weeks are the sets and reps you’ll be performing for each corresponding week.
If we look at the top column, you will see that for the 1st exercise you will be asked to perform a Dumbbell Goblet Squat. During Week 1 your allocated Sets & Reps is 3 x 10. This means 3 sets of 10 reps.
N.B A common mistake people make is keeping the same weight throughout the programme. Using the above example, if for the first 2 weeks you perform 3×10 on a squat and then following 2 weeks it says 3×8, this is where you now increase the weight as you are doing fewer reps.
We hope that is make sense.
Now if you look to the 2 boxes below each sets & reps allocation you will see 2 rectangular boxes that are empty. These are simply for you to log what you have done. For example, you can log the weight lifted and the amount of reps performed here. This simply allows us to keep track of what you have done!
Comments

In the comments box, we sometimes like to give you a brief reminder of how to execute the exercise. For example, with this squat, we would like you to exhale fully as you sit down into the squat.
Rest Periods

This section simply refers to the amount of rest we would like you to take between your sets. In this case we would like you to rest for 60 seconds between the paired exercises of the Squat and the Press Up.
This means in week 1, you perform 10 repetitions of the squat, rest for 60 seconds and then perform 6 repetitions of the Press Up. You then rest for a further 60 seconds ang go back to the squat until the cycle of 3 sets of each is completed.
Remember you need to pay particular attention to the number before the exercise as they will tell you whether you are to perform the exercise on its own or part of a superset.
R6 - Resiliency
Don’t worry, this section is incredibly simple.
One thing we will say at this point is, download an app on your phone to make timing your intervals easy peasy!
2 of our favourite apps are “Seconds App” and “Interval Timer” – Both work well!
Our most commonly used resiliency table looks like this:

As you can see you have your exercise weeks, intensity, recovery, repeats and comments columns.
If we walk you through this now, all you need to know is Intensity is the work period. Recovery is the rest period. Repeats refers to how many intervals (sets) you are to complete. Finally, the comments section provides a reminder of what we would like you to do.
In the example above:
Week 1: You are to run at 70% of your maximum effort. Ideally perform the recovery period FIRST. IE you would walk first for 45second and then sprint at 70% for 15s, you would then repeat this for 9 more times for a total of 10 repeats.
Another Example:

In this example, everything remains the same except now, all you have to do is set a timer for 10 minutes and record how many reps you can perform within this timeframe.
You will notice the recovery section now also gives you 2 options. For those of you that own a chest strap heart rate monitor, you are now to recover until your heart rate drops down to 130 beats per minute OR until you have rested for 60 seconds (whichever comes first).
For those that do not have access to a heart rate chest strap and monitor, just rest for 60 seconds.
At the end of the session, record how many reps you achieved. You should notice it increases week by week as your conditioning improves.
R7 - Recovery

This section is super simple! By this point you’ve done your work, it’s now time to shift your mental and physical state into one of relaxation. This will ensure your body can begin the recovery process!
All you have to do here is allocate yourself 2 to 3 minutes where you can perform the exercise (in a state of peace and quiet where possible) whilst allowing yourself to switch off mentally and physically. Focus on relaxing your body so that there is no tension and just focus on your breathing, ensuring it is relaxed and slow.
N.B – One thing to add here is that if you have just performed a high intensity set in your resiliency section, YOU MUST allow your heart rate and your breathing to naturally come down before completing your recovery exercise. Nothing good will come from trying to relax into your recovery exercise if your heart rate is still pumped from the workout!
Trustindex verifies that the original source of the review is Google. Ollie has always been my go to person for my long list of sports related tweaks and pains, most recently I turned up barley walking due to a calf injury. Ollie methodically worked out my issue as usual and I was quickly set a plan on how to get back running. In addition to this Ollie also helped me understand how my current training plan could have caused the injury and gave me some tips for when I was back running. Fast forward a few months and I've produced 5k and 10k PBs and can knock out a 15k without a hint of a worry about my calf. Cheers Ollie! Fantastic as always!Trustindex verifies that the original source of the review is Google. These folks really know their stuff and in particular I can’t speak highly enough of Ollie. He helped me no end with my rehab following my knee replacement with a thorough programme of exercises. If you’re a detail oriented person, you’ll like working with Ollie as he takes time to explain the mechanics of everything he’s recommending which I found very reassuring. Most of all though he’s very approachable and always up for a bit of friendly banter. Top chap I reckon!Trustindex verifies that the original source of the review is Google. I can’t recommend Ollie enough. After struggling with foot issues that no one else seemed to fix, Ollie took a really hands-on approach and got to the root of the problem. This wasn’t one of those passive therapy sessions – I was actively involved in my recovery, and it made such a difference. Super knowledgeable, attentive, and effective.Trustindex verifies that the original source of the review is Google. Extremely knowledgeable, helpful, professional and friendly physio service. Most importantly, they have always diagnosed my issues and provided rehabilitation plans that fully worked. I highly recommend them.Trustindex verifies that the original source of the review is Google. We have been using Stuart, and Ollie on occasion, as our physios/therapists for some time. The service they provide is superb and they have sorted us out on numerous occasions. We should see them more often! They are very personable and approachable. I recommend them to anyone who will listen.Trustindex verifies that the original source of the review is Google. Stuart’s acupuncture skills are marvellous as well as his knowledge always on top of the game with his skill to rehabilitate!Trustindex verifies that the original source of the review is Google. I came to Ollie after suffering with severe back pain for 4 months. Ollie conducted a thorough assessment to determine what might be causing the pain. explained the treatment plan in detail and checked in regularly to see how I was progressing I am now back to the gym and not in constant pain. Highly recommend!Trustindex verifies that the original source of the review is Google. My dad started visiting At One a couple of years after he suffered a stroke. He had plateaued in his recovery and was recommended Ollie Attoe as a therapist he could set goals and work with to continue recovery. I've seen my Dad improve not only physically but also he seems much happier with his progress. Ollie has created him a structured rehab programme with achievable goals. Thanks Ollie!Trustindex verifies that the original source of the review is Google. I presented an Achilles Heel pain back in January 2024. I began working with Ollie to improve my condition. He provided a range of exercises, and with each session evolving as my condition improved. I started running pain free in May and am enjoying maintaining my strength and conditioning. Ollie, is intelligent, friendly, adaptive, and imaginative. I would recommend this practice for anyone seeking professional Physiotherapy.Trustindex verifies that the original source of the review is Google. Having experienced a series of serious injuries via sport over a 40 year period, I have seen many Physio's. I am pleased to report there are none better than Stuart.
Speak to the team
If you are unsure where best to start, we recommend speaking to a member of the team. If you fill in the form below, we will reach out to you to find out a bit more about you and your current problems and how we can help. Its that simple – no obligation just a friendly chat to see if we are the place for you.